
We know it can seem confusing the first time you see or hold a strumstick such as ours. So here are some simple tunes to get you started. Have a request for a tune you’d like to see if it can be played on the instrument? Get in touch – let us know and we may add it to this page for others to enjoy.
(We also have published a free Christmas songbook containing 30 popular melodies and traditional carols to enjoy during the yearly festive period)
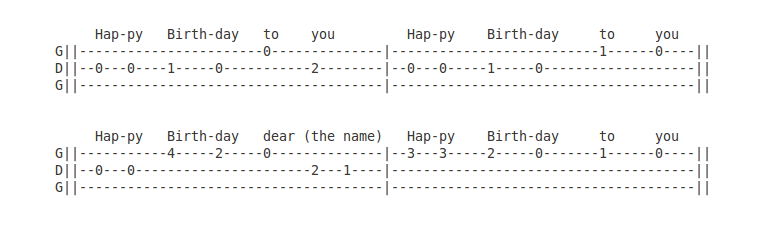
Happy Birthday
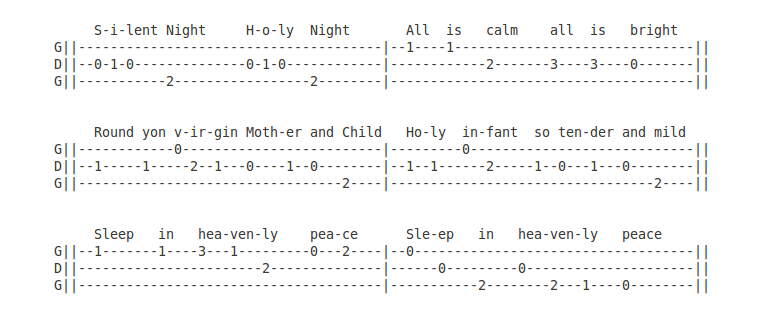
Silent Night
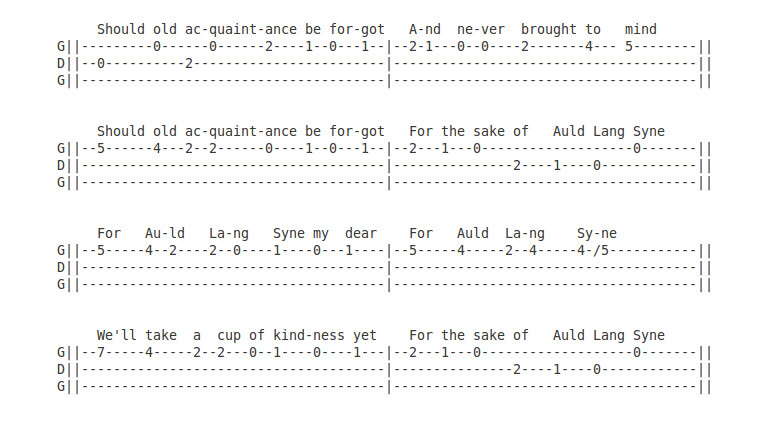
Auld Lang Syne
Here is a short video demonstrating the above tune played with a little embellishment, by adding extra notes from the un-fretted strings, to help fill out the melody.
Notes
Are you puzzled by this musical notation? Don’t worry. This is called “Tablature” or “Tab” for short. Each line represents a string of the instrument. The top line is the highest pitched (thinnest) string, furthest away from you as you play it. The bottom line is the lowest pitched (thickest) string, closest to you as you play it. Imagine tipping the neck up so that the fingerboard and frets are facing the sky, and you are looking down on it. This view of the instrument would match the layout of the Tab.
The letters to the side of each line represents the pitch of each string. The standard tuning – from bottom to top – is low G, D and high G, like a cigar box guitar. (F#, C# and F# sounds great as well. Precise tuning is of lesser importance, as long as the instrument sounds good to you)
Pro tip: One way to quickly check the relative tuning of your instrument is to play the note of the 3rd fret on the middle string, followed by the high string with no fretted note. The two pitches should be the same. Now repeat this for the other two strings, but this time play the 4th fret on the low string, followed by middle string with no fretted note. Again, the two pitches emitted should sound the same. If you do need to re-adjust the tuning of your instrument then much of the advice regarding the physicality of doing so can be followed from the footnote in our canjo guide
The numbers on each line represent the fret of the string that needs to be plucked. Press the string down firmly just behind the fret and never directly on the fret itself. A zero represents the “open” string with no note fretted. The frets are numbered 1 to 7 – with 1 being closest to the tuning pegs and 7 being the furthest up the neck, near the pencil case body. There are fret marker dots at the 3rd and 7th frets to help you navigate the instrument more easily.
(Note that the “Tabs” on this page are specific to the unusual fret layout of the strumstick and will not work for conventional guitars without some transposing of fret numbers)
The beauty of the strumstick instrument (as the name suggests) is that single plucked notes can be transformed into chords simply by playing (“strumming”) the other strings open at the same. Try this and see how it sounds…
Enjoy!
Pro tip: Experiment with plucking/strumming the string(s) at different places on the instrument. Playing nearer the bridge (the pencil!) will give a tone with more “treble”, where as nearer the neck will give a more mellow, softer sound. Personally we find the “sweet spot” to be where the neck meets the body of the instrument, just to the left of the sound holes (or to the right, if you are a left handed player – and you hold the instrument the other way around)
“Real” chords
Although the strumstick is designed to be suitable even for those with no musical knowledge to be able to play, with its strength being the playing of melody (typically on the high-pitched “top-string”) and the open lower strings acting as “drone” notes, it is nonetheless possible to apply conventional theory and technique to the instrument. Below we have created a graphic illustrating a sequence of “chord windows” specially produced for our instrument. For those not familiar with the concept of guitar chord windows, each vertical line represents a string of the instrument as viewed if the neck was held upright. The top horizontal line of the grid represents the “nut” of the instrument over which the strings travel to the tuning pegs. The rest of the horizontal lines represent the frets of the instrument. As such, these chord windows are contained to only the first 3 frets of the instrument, thus making these particular chords easy to play and locate when changing finger positions. The black circles give an indication as to where – on which string – to press down fingers behind the appropriate fret. The small “o” above certain strings, simply means to play the string “open” without any fingered notes.
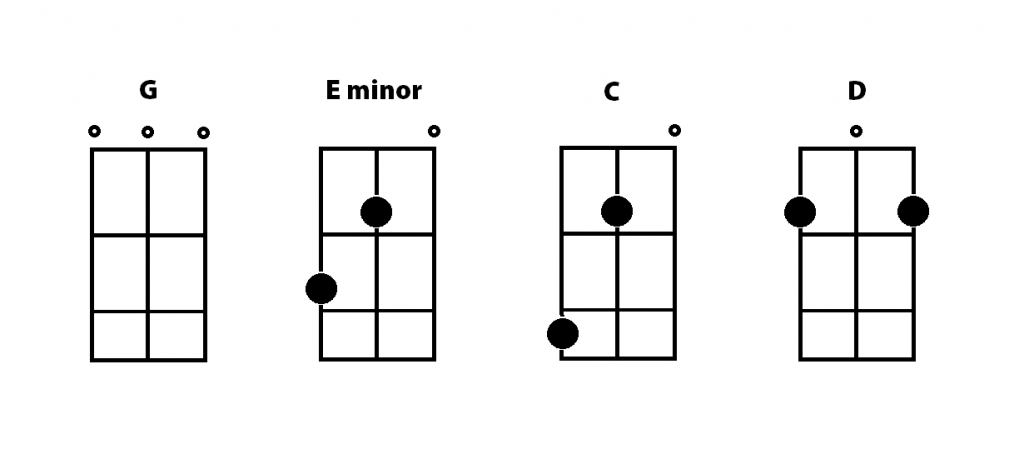
Play this sequence of chords in turn… G, E minor, C, D. Start just by strumming each chord once, then gently moving on to the next (allowing you plenty of time to readjust fingers). When you get used to the changes, play each chord 4 times each, with greater emphasis on the first stroke. As a variation, play simple “arpeggios” – fluidly plucking each string of the chord in turn.
Sounds nice, doesn’t it? And maybe a little familiar too. This should be no surprise given the amount of popular songs that feature this exact same chord sequence, and can thus be played (in the key of G) on the pencil case strumstick. “Stand By Me”, “Earth Angel” (as featured in the movie “Back to the Future”), “Last Kiss” (as covered by Pearl Jam), “Eternal Flame”, “Every Breath You Take”, “Crocodile Rock”, “Please Mr Postman”, “Nothing’s Gonna Stop us Now” – through to Lady Gaga’s “Million Reasons”… each of these songs and many more are centred around (sometimes solely consisting of) this same sequence of relative chords.
Every decade, from the ’50s to the present, hit songs have continued to be written using this progression. Perhaps the Salvage Sounds pencil case strumstick will be responsible for inspiring the composition of a future smash? You never know…
Other chords and variations
You can change things up by mixing the order of chords. Try this with our classic G, E minor, C, D progression by instead playing E minor, C, G, D – or how about C, G, D, E minor? See if you can find other pleasing sounding combinations.
Also, play progressions that use only 2 or 3 of the 4 chords, to extend the permutations. For a 3 chord combination, one would normally play a single measure or “bar” of the 1st 2 chords, followed by 2 measures (bars) of the 3rd chord. In popular music, a bar typically consists of 4 (sometime 3) “beats” – which we can equate to a “strum”. For example:
G 2 3 4
D 2 3 4
C 2 3 4 C 2 3 4
Or, play the 2 bars on the first chord in sequence instead, like:
D 2 3 4 D 2 3 4
G 2 3 4
C 2 3 4
And try building up to a different strumming rhythm within the 4 beats, by introducing upward strums (known as “upstrokes”). Such as:
1 2 3 & 4
Or
1 & 2 & 3 & 4 &
But do not think you are only limited to using just these 4 chords on our instrument though. Experiment – there are plenty of other chords to be discovered! Create chord inversions and variations by playing reversed “mirror images” of shapes, such as those of the E minor and C we have shown you – with the low G played open, and the bottom fretted note instead on the high string. Move the shapes you create up and down the neck for a different effect. Concentrate on simple 2-finger shapes on the middle and high string (such as a “half V” shape, or both fingers at the same fret) and leave the low G to act as a “pedal tone” for a fuller sound.
A closing demonstration
These techniques above – of playing melody on individual strings, and traditional chords – can be combined to achieve an overall effect of simultaneous underlying chord changes with a melody on top (similar to how a piano is typically played). The below video provides a demonstration using a well-known Irish folk song, which also has become established as a famous rock classic – and gives an indication of the potential of the instrument. This entire piece uses only the first 3 frets, and combines the 4 main chords we have already explored (both as “strums” of various patterns, and plucked “arpeggios” as we have discussed) with a melody line that is played almost exclusively on just the bottom 2 strings of the instrument, mainly the middle.
All the best, and please always feel free to contact us if any support, help or advice is ever required. We would love to hear how you are getting on.